上一篇深入拆解了 Slash Commands 設計。這篇延伸到互動元件,拆解按鈕互動的完整流程。
Slash Command 觸發後,Bot 不只能回一段文字,還可以附上按鈕讓使用者繼續操作。按鈕是 discord.js 裡最常用的互動元件,也是「對話式 UI」的核心。
概念:訊息附件(Component)
Discord 的按鈕不是直接貼在訊息上,而是透過兩層巢狀結構附加:
- 訊息 →
components欄位,放 ActionRow 陣列(最多 5 個)- ActionRow → 一橫排容器(最多放 5 個 Button)
- Button → 最終顯示的按鈕元件
- ActionRow → 一橫排容器(最多放 5 個 Button)
所謂「兩層」就是:ActionRow 包 Button,訊息包 ActionRow。ActionRowBuilder 對應一排、ButtonBuilder 對應一顆按鈕,最後把 ActionRow 放進 components 陣列送出去。一則訊息最多 5 排 × 5 顆 = 25 個按鈕,實際上通常 1–2 個 ActionRow 就夠了。
建立按鈕並附在訊息裡
discord.js v14 用 ActionRowBuilder + ButtonBuilder 組合。先看 ButtonStyle 有哪些選項:
| Style | 顏色 | 說明 |
|---|---|---|
Primary | 藍色 | 主要操作 |
Secondary | 灰色 | 次要或取消 |
Success | 綠色 | 確認、完成 |
Danger | 紅色 | 刪除、危險操作 |
Link | 灰色(外部連結) | 不觸發互動事件,直接開連結 |
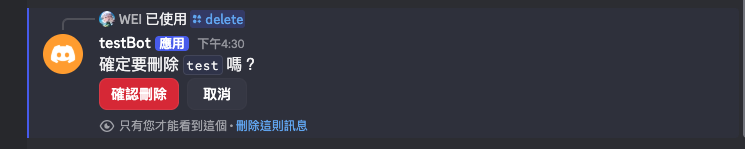
以「確認刪除」流程為例——紅色確認鈕 + 灰色取消鈕:
import { ActionRowBuilder, ButtonBuilder, ButtonStyle } from "discord.js";

const row = new ActionRowBuilder().addComponents(
  new ButtonBuilder()
    .setCustomId("confirm_delete")
    .setLabel("確認刪除")
    .setStyle(ButtonStyle.Danger),
  new ButtonBuilder()
    .setCustomId("cancel_delete")
    .setLabel("取消")
    .setStyle(ButtonStyle.Secondary)
);

await interaction.reply({
  content: "確定要刪除這筆記錄嗎?",
  components: [row],
  flags: 64, // ephemeral,只有本人看到
});
ButtonStyle 四種顏色並排對照:

Link 類型不需要 customId,改用 .setURL("https://...") 指定目標,點擊後直接開連結不觸發互動事件。
isButton():接收按鈕事件
使用者按下按鈕後,interactionCreate 事件觸發,interaction.isButton() 回傳 true:
client.on("interactionCreate", async (interaction) => {

  if (interaction.isButton()) {
    const { customId } = interaction;

    if (customId === "confirm_delete") {
      return handleConfirmDelete(interaction);
    }
    if (customId === "cancel_delete") {
      return handleCancelDelete(interaction);
    }
    return;
  }

  // ... 其他互動類型
});handler 裡用 interaction.update() 替換原始訊息(含按鈕),或用 interaction.reply() 另外回覆:
async function handleConfirmDelete(interaction) {
  // 執行刪除邏輯...
  await doDelete(interaction.user.id);

  // 更新原本的訊息,移除按鈕
  await interaction.update({
    content: "✅ 已刪除。",
    components: [], // 清空按鈕
  });
}

async function handleCancelDelete(interaction) {
  await interaction.update({
    content: "已取消。",
    components: [],
  });
}interaction.update() 會修改按鈕所在的那則訊息,是最常見的用法。如果要另外回一則新訊息,改用 interaction.reply()。

customId 帶參數
按鈕的 customId 是純字串,最長 100 字元。需要帶參數時,用分隔符拼接:
// 建立按鈕時帶入目標 ID
const targetId = "user_abc123";

const row = new ActionRowBuilder().addComponents(
  new ButtonBuilder()
    .setCustomId(`confirm_kick_${targetId}`)
    .setLabel("確認踢出")
    .setStyle(ButtonStyle.Danger)
);在 handler 裡解析:
if (customId.startsWith("confirm_kick_")) {
  const targetId = customId.replace("confirm_kick_", "");
  return handleConfirmKick(interaction, targetId);
}這樣不需要另外維護一個 Map 來存「哪個按鈕對應哪個目標」,把資訊直接編在 customId 裡更簡單。
按鈕逾時
Discord 的按鈕沒有內建逾時機制,按鈕會永遠留在訊息裡。如果需要限制時間(例如 30 秒內沒按就失效),要自己處理:
const row = new ActionRowBuilder().addComponents(
  new ButtonBuilder()
    .setCustomId("confirm_action")
    .setLabel("確認")
    .setStyle(ButtonStyle.Primary)
);

// 30 秒後停用按鈕
const reply = await interaction.reply({
  content: "請在 30 秒內確認:",
  components: [row],
  flags: 64,
});

setTimeout(async () => {
  const disabledRow = new ActionRowBuilder().addComponents(
    new ButtonBuilder()
      .setCustomId("confirm_action")
      .setLabel("已逾時")
      .setStyle(ButtonStyle.Secondary)
      .setDisabled(true)
  );
  await interaction.editReply({ components: [disabledRow] });
}, 30_000);.setDisabled(true) 讓按鈕在視覺上變灰、無法點擊。

完整流程總覽
client.once("ready")
  └── guild.commands.set(COMMANDS)   ← 把 /delete 註冊到 Discord

使用者輸入 /delete target_id:xxx
  └── interactionCreate → isChatInputCommand() → commandName === "delete"
        └── handleDelete(interaction)
              └── interaction.reply({ content, components: [row], flags: 64 })
                    └── 使用者看到訊息 + 按鈕

使用者點擊「確認刪除」
  └── interactionCreate → isButton() → customId.startsWith("confirm_delete_")
        └── handleConfirmDelete(interaction, targetId)
              └── doDelete(targetId)
              └── interaction.update({ content: "✅ 已刪除", components: [] })
完整骨架總結
把這篇所有概念組合在一起,index.js 的按鈕互動結構長這樣:
import {
  Client, GatewayIntentBits,
  ActionRowBuilder, ButtonBuilder, ButtonStyle,
} from "discord.js";
import "dotenv/config";

const client = new Client({
  intents: [GatewayIntentBits.Guilds, GatewayIntentBits.GuildMembers],
});

// ── 1. 指令定義 ───────────────────────────────────────────────
const COMMANDS = [
  {
    name: "delete",
    description: "刪除一筆記錄",
    options: [
      {
        name: "target_id",
        type: 3,            // STRING
        description: "要刪除的記錄 ID",
        required: true,
      },
    ],
  },
];

// ── 2. ready:註冊指令 ────────────────────────────────────────
client.once("ready", async () => {
  const guild = await client.guilds.fetch(process.env.GUILD_ID);
  await guild.commands.set(COMMANDS);
  console.log("✅ Bot 上線,指令已更新");
});

// ── 3. 發送帶按鈕的訊息(在 Slash Command handler 裡呼叫)──────
async function handleDelete(interaction) {
  const targetId = interaction.options.getString("target_id"); // 假設指令有此 option

  const row = new ActionRowBuilder().addComponents(
    new ButtonBuilder()
      .setCustomId(`confirm_delete_${targetId}`)
      .setLabel("確認刪除")
      .setStyle(ButtonStyle.Danger),
    new ButtonBuilder()
      .setCustomId("cancel_delete")
      .setLabel("取消")
      .setStyle(ButtonStyle.Secondary)
  );

  await interaction.reply({
    content: `確定要刪除 \`${targetId}\` 嗎?`,
    components: [row],
    flags: 64, // ephemeral,只有本人看到
  });

  // 30 秒後自動停用按鈕
  setTimeout(async () => {
    const disabledRow = new ActionRowBuilder().addComponents(
      new ButtonBuilder()
        .setCustomId(`confirm_delete_${targetId}`)
        .setLabel("已逾時")
        .setStyle(ButtonStyle.Secondary)
        .setDisabled(true)
    );
    await interaction.editReply({ components: [disabledRow] });
  }, 30_000);
}

// ── 4. interactionCreate:按鈕事件路由 ───────────────────────
client.on("interactionCreate", async (interaction) => {

  // 按鈕互動
  if (interaction.isButton()) {
    const { customId } = interaction;

    if (customId.startsWith("confirm_delete_")) {
      const targetId = customId.replace("confirm_delete_", "");
      return handleConfirmDelete(interaction, targetId);
    }
    if (customId === "cancel_delete") {
      return handleCancelDelete(interaction);
    }
    return;
  }

  // Slash Command
  if (!interaction.isChatInputCommand()) return;
  if (interaction.commandName === "delete") return handleDelete(interaction);
});

// ── 5. handler:確認刪除 ──────────────────────────────────────
async function handleConfirmDelete(interaction, targetId) {
  // 執行實際刪除邏輯(換成你的資料層呼叫)
  // await deleteRecord(targetId);

  await interaction.update({
    content: `✅ \`${targetId}\` 已刪除。`,
    components: [], // 清空按鈕
  });
}

async function handleCancelDelete(interaction) {
  await interaction.update({
    content: "已取消。",
    components: [],
  });
}

client.login(process.env.BOT_TOKEN);核心模式是:指令觸發 → reply 附帶按鈕 → 使用者點擊 → isButton() 路由 → update() 替換原訊息。customId 帶參數讓按鈕本身就能傳遞上下文,不需要額外的狀態管理。
下一篇會拆解下拉選單(StringSelectMenu)的設計:怎麼建立選項、怎麼接收 isStringSelectMenu() 事件,以及動態選項的注意事項。