上一篇把部署與穩定性補齊後,Bot 已經能長時間運行。這篇我們做一個超實用的功能:讓使用者用彈出表單提交回饋,而且直接串進你前面做好的資料層。
Modal 是什麼
Modal 就是 Discord 的彈出式表單,適合一次收多欄位或長文字。
你可以把它想成:指令先開表單,送出後 Bot 才拿到完整資料。
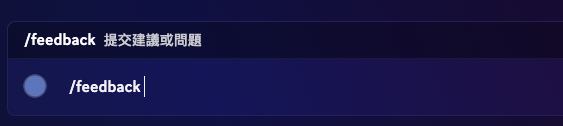
- 使用者輸入
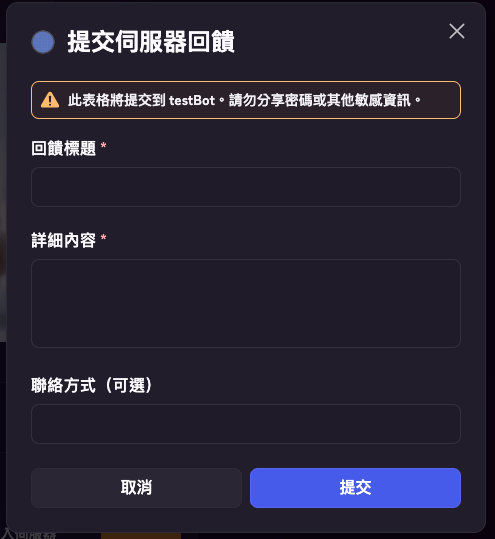
/feedback。 - Bot 跳出表單(標題、內容、聯絡方式)。
- 使用者送出後,Bot 在
isModalSubmit()處理資料。
簡單分法:短輸入用 option,長內容或多欄位用 Modal。
指令與互動流程
先準備兩個重點:
/feedback只負責顯示 Modalinteraction.isModalSubmit()才是表單資料真正送進來的地方
先在 .env 設定回傳用的頻道 ID FEEDBACK_CHANNEL_ID:
BOT_TOKEN=你的BotToken
GUILD_ID=你的測試伺服器ID
FEEDBACK_CHANNEL_ID=要回傳訊息的頻道ID
SPREADSHEET_ID=你的試算表IDimport {
ActionRowBuilder,
Client,
EmbedBuilder,
GatewayIntentBits,
ModalBuilder,
TextInputBuilder,
TextInputStyle,
} from "discord.js";
import "dotenv/config";
const client = new Client({ intents: [GatewayIntentBits.Guilds] });
const COMMANDS = [
{ name: "feedback", description: "提交建議或問題" },
];
client.once("ready", async () => {
const guild = await client.guilds.fetch(process.env.GUILD_ID);
await guild.commands.set(COMMANDS);
console.log(`Bot 已上線:${client.user.tag}`);
});
client.on("interactionCreate", async (interaction) => {
if (interaction.isChatInputCommand() && interaction.commandName === "feedback") {
const modal = new ModalBuilder()
.setCustomId("feedback_modal")
.setTitle("提交伺服器回饋");
const titleInput = new TextInputBuilder()
.setCustomId("feedback_title")
.setLabel("回饋標題")
.setStyle(TextInputStyle.Short)
.setMaxLength(60)
.setRequired(true);
const contentInput = new TextInputBuilder()
.setCustomId("feedback_content")
.setLabel("詳細內容")
.setStyle(TextInputStyle.Paragraph)
.setMinLength(10)
.setMaxLength(1000)
.setRequired(true);
const contactInput = new TextInputBuilder()
.setCustomId("feedback_contact")
.setLabel("聯絡方式(可選)")
.setStyle(TextInputStyle.Short)
.setRequired(false);
modal.addComponents(
new ActionRowBuilder().addComponents(titleInput),
new ActionRowBuilder().addComponents(contentInput),
new ActionRowBuilder().addComponents(contactInput),
);
await interaction.showModal(modal);
return;
}
if (interaction.isModalSubmit() && interaction.customId === "feedback_modal") {
const title = interaction.fields.getTextInputValue("feedback_title");
const content = interaction.fields.getTextInputValue("feedback_content");
const contact = interaction.fields.getTextInputValue("feedback_contact") || "未提供";
const embed = new EmbedBuilder()
.setColor("Blue")
.setTitle("新回饋")
.addFields(
{ name: "標題", value: title },
{ name: "內容", value: content },
{ name: "聯絡方式", value: contact, inline: true },
{ name: "提交者", value: `${interaction.user.tag} (${interaction.user.id})`, inline: true },
)
.setTimestamp();
const feedbackChannelId = process.env.FEEDBACK_CHANNEL_ID;
if (!feedbackChannelId) {
await interaction.reply({ content: "未設定 FEEDBACK_CHANNEL_ID", flags: 64 });
return;
}
const feedbackChannel = await client.channels.fetch(feedbackChannelId);
if (feedbackChannel?.isTextBased()) {
await feedbackChannel.send({ embeds: [embed] });
}
await interaction.reply({ content: "已收到你的回饋,感謝!", flags: 64 });
}
});
client.login(process.env.BOT_TOKEN);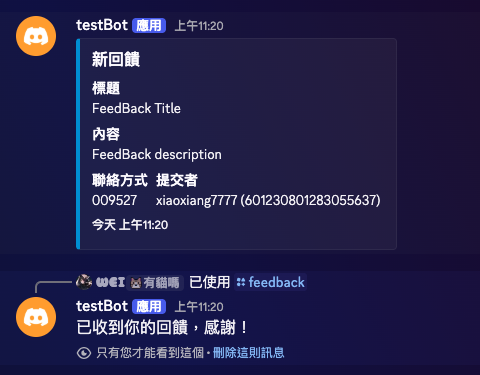
串進 Google Sheets
先在試算表新增一個分頁,名稱設為 回饋紀錄。
接著在 googleSheets.js 補一個 appendFeedback:
export async function appendFeedback({ userId, userTag, title, content, contact }) {
  const now = new Date().toLocaleString("zh-TW", { timeZone: "Asia/Taipei" });

  await sheets.spreadsheets.values.append({
    spreadsheetId: process.env.SPREADSHEET_ID,
    range: "回饋紀錄!A:F",
    valueInputOption: "USER_ENTERED",
    resource: {
      values: [[now, userId, userTag, title, content, contact || "未提供"]],
    },
  });
}在 isModalSubmit 裡送訊息前加一行:
await appendFeedback({
  userId: interaction.user.id,
  userTag: interaction.user.tag,
  title,
  content,
  contact,
});
實戰注意事項
- Modal 最多 5 個欄位,超過就要拆流程。
Paragraph欄位適合長文,但也要給maxLength。- 管理頻道 ID 一定要放
.env:FEEDBACK_CHANNEL_ID=...。 - 回覆用 ephemeral,避免把使用者提交內容公開到原頻道。
下一篇預告
這篇完成後,你的 Bot 已經有第一個真正的表單型功能。下一篇接 Autocomplete,把查詢體驗從「輸入完才出結果」升級成「輸入中就有建議」。